How Do You Remove Screen Printing from A Shirt?

How Do You Remove Screen Printing from A Shirt?
Whether you’ve bought a T-shirt you love but the print is slowly cracking or fading, you’ve grown tired of the design and want a new one, or you accidentally bought a shirt with an unwanted advertisement and want to “save” it—you’ll inevitably face a common yet tricky problem: How do you remove a screen-printed design from a shirt?
The reason screen-printed designs are so difficult to remove is that the ink isn’t simply applied to the surface; instead, a thick layer of ink “bites” into the fibers or cures onto the fabric, creating an extremely strong bond. This is different from ordinary heat-transfer stickers or inkjet prints—forcing it off by tearing or scrubbing often won’t work and may even damage the fabric. Fortunately, there are always more solutions than problems. As long as you first understand a few key points and then use the right method, most prints can be safely removed.

Three Things to Do Before You Begin
First, identify the type of ink. The inks commonly used in screen printing fall into three broad categories: water-based inks (commonly used on children’s clothing and light-colored garments; relatively easy to handle), solvent-based inks (have a strong chemical odor; are abrasion- and water-resistant; the most difficult to handle), and plastic/thermosetting inks (cure when heated; soften when exposed to high temperatures; can be removed using heat). You must clearly identify the ink to choose the right method.
Second, identify the fabric. Natural fibers such as cotton and linen are heat- and solvent-resistant, allowing for greater flexibility in handling; synthetic fibers (polyester, nylon) are sensitive to high temperatures and tend to melt, shrink, or deform when exposed to heat, so extra caution is required; for blended fabrics, follow the “lowest common denominator” principle and treat them according to the most delicate component. This directly determines the choice of temperature and solvent.
Third, test it on an inconspicuous area first. No matter which method you use, start by testing it on a small, hidden area—such as the inside of the hem or the inside of the cuff—to make sure it doesn’t cause fading, distortion, or corrosion before proceeding with the full treatment. This is the safest step, yet it’s also the one most often skipped by beginners.
Method 1: Chemical Solvent Method — For Solvent-Based and Stubborn Ink Types
This is the most effective method for dealing with thick screen-printed ink. Common “tools” include:
Plastisol Remover is the most professional choice, specifically designed to remove plastisol ink. It is gentle yet effective and can be purchased online or at screen printing supply stores. To use it, apply the remover to the front or back of the print and let it sit for a few minutes to allow the solvent to penetrate and soften the ink. Then, gently brush along the grain with an old toothbrush or soft-bristled brush; the ink will flake off in chunks. Finally, wipe clean with a damp cloth and rinse with water.
Isopropyl alcohol (IPA) or high-concentration alcohol is a common household alternative. Dip a cotton swab into the solution, apply it to the edges of the design, and gently wipe; the ink will gradually dissolve and loosen. It is effective on most solvent-based inks, evaporates quickly, and leaves few residues.
Acetone or nail polish remover has stronger dissolving power and can tackle quite stubborn ink stains, but it will also dissolve some synthetic fibers and may damage the garment’s original color. It is recommended only for use on 100% cotton or solvent-resistant fabrics, and you must be sure to avoid areas outside the printed design
Please note that solvent-based methods tend to have a noticeable odor; it is best to perform this in a well-ventilated area and wear disposable gloves to protect your hands.
Method 2: Heating Method — For Heat-Curable (Plastic) Inks
If your print uses heat-curable (plastic) ink, heating it will soften it and restore its stickiness, making it easy to peel off.
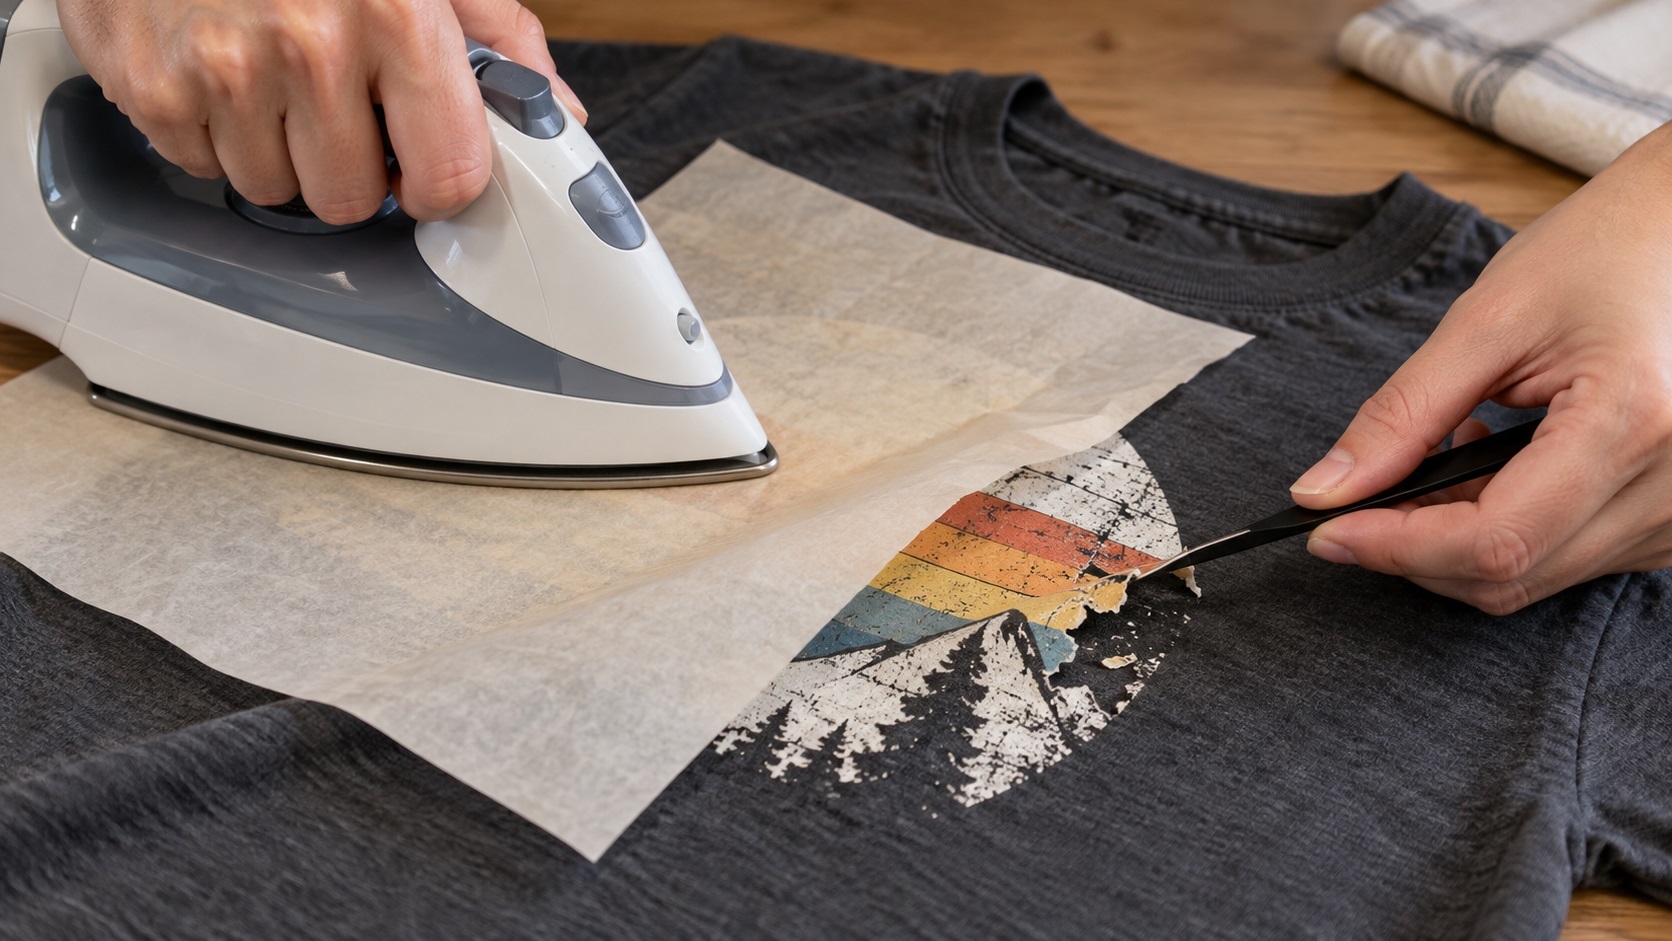
A household iron will do the trick: Set the temperature to medium-high (use a low setting for synthetic fabrics), place a sheet of parchment paper or an old cloth over the print as a barrier to prevent the ink from sticking directly to the iron, and then iron the area repeatedly for 30 seconds to 1 minute to soften the ink layer. While it’s still warm, use tweezers or a stiff card to gently lift the edge; most designs will peel off in one piece. Wipe away any remaining ink residue with alcohol or a remover. The heating method is particularly effective for plastic prints on cotton T-shirts and is the preferred choice for many who prefer to avoid chemicals.
Method 3: Physical Rubbing and Household Tricks
For water-based ink or shallow prints, “heavy-duty” methods aren’t always necessary. Alcohol and a toothbrush are the most common household combination: First, pour alcohol onto the print to moisten it, then gently brush back and forth in alternating horizontal and vertical strokes with the toothbrush; the ink will peel off layer by layer. Repeatedly applying and peeling off adhesive tape can also remove surface ink particles, making it suitable for treating old prints that have already cracked; some people also use baking soda or toothpaste for gentle abrasion, wiping in circular motions with a damp cloth to gradually fade residual marks.
These methods take time to work and require patience, but their advantage lies in being safe and gentle—they cause almost no damage to clothing and are particularly suitable for everyday care when you prefer to avoid solvents.
Precautions
Do not scrape vigorously with a blade. Metal blades can easily tear the fabric, leaving irreparable holes—which isn’t worth the trouble. Do not set the temperature too high. Synthetic fabrics can melt, shrink, turn white, or harden when exposed to high heat; once this happens, they cannot be salvaged. Do not ignore odors or irritation. Solvent-based products are mostly organic compounds, so be sure to work in a well-ventilated area and keep them away from open flames. Also, don’t expect “zero traces.” In most cases, after the ink layer is removed, a faint outline or slight color difference will remain on the fabric. This is a normal result of the screen-printing ink seeping into the fibers and should not be considered a failure—you can print a new design later or treat it as a vintage, distressed effect.
Removing screen prints from T-shirts is essentially a delicate process that requires a “tailored approach”: identify the type of ink, assess the fabric’s durability, test on a small area first, and then choose the right method from among solvents, heat, and physical techniques. By mastering these techniques, you’ll not only be able to salvage a cherished garment but also handle printed items with greater ease—after all, understanding “how to remove” is, in itself, the flip side of understanding “how to print.”
What Does It Take to Do Screen Printing?
Related Article