
What is silk screen printing?
What is silk screen printing?
Silk screen printing, commonly referred to as serigraphy, derives its name from two Greek terms: "seicos," which translates to silk, and "graphos," meaning writing. This technique, along with other stencil-based printing methods, represents some of the earliest forms of printmaking.
Printmaking is a methodology for creating editions—multiple original artworks—while painting typically results in a singular original piece. In the realm of printmaking, each print produced within an edition is regarded as an original work of art, rather than a mere reproduction.
Silk screen printing is a stencil-based technique that employs the application of ink through stencils supported by a porous fabric mesh, which is tensioned across a frame known as a screen. This method is particularly well-suited for the creation of bold and graphic designs.
Silkscreen printing has origins that can be traced back to 9000 BC, when stencils were employed to embellish Egyptian tombs and Greek mosaics. During the period from 221 to 618 AD, stencils were utilized in China for the reproduction of Buddhist imagery. Japanese artists elevated screen printing into a sophisticated art form by developing a meticulous technique in which a piece of silk was tensioned across a frame to act as a medium for hand-cut stencils.
Silkscreen printing made its way to the Western world in the 15th century. Initially, the primary material used in the screen printing process was silk.
In the United States, screen printing gained recognition as a legitimate art form in the 1930s when a collective of artists associated with the Federal Art Project began to explore the technique. This experimentation led to the establishment of the National Serigraphic Society. American artists started producing "fine art" screen prints and coined the term "Serigraph" to differentiate their artistic endeavors from commercial screen printing practices. During the 1960s, Serigraphy became particularly popular among Pop artists, who were drawn to its vibrant areas of flat color.

How is it done?
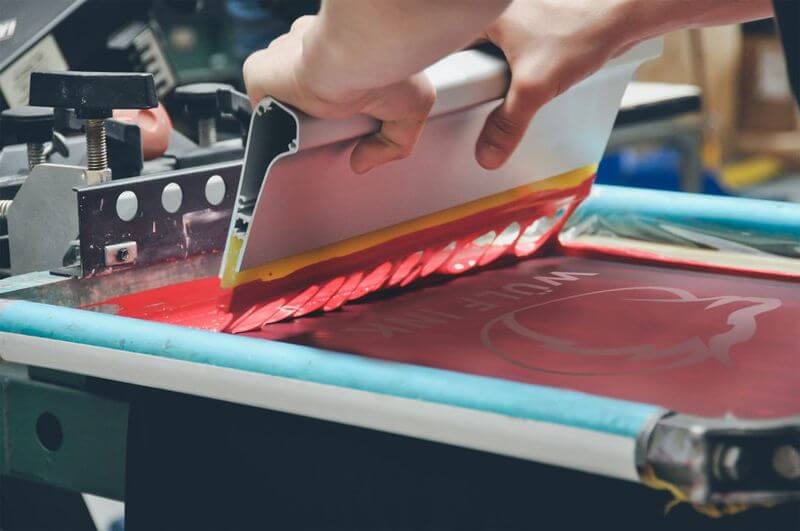
The fundamental process of screen printing involves the application of ink through a stencil onto a substrate, typically paper, using a squeegee. This action is referred to as "pulling." For each print to accurately replicate the original artwork, it is essential that each color is applied in the same location and sequence.
The initial step in the process is the creation of an original image. Following this, the screen printer utilizes their expertise and aesthetic preferences to devise a distinct stencil for each color. Each stencil is then affixed to its corresponding screen.
Inks are meticulously custom-mixed by the artist to match the colors of the original artwork and to achieve the desired outcomes in hue and value. In my prints, the number of colors utilized in a silkscreen print can vary significantly; typically, there are at least six distinct colors, but a single image may incorporate as many as 40 colors.
The screen printer meticulously applies ink across the printing frame, which is positioned above a sheet of paper designated to receive the artwork. The ink is then compelled through the mesh screen and onto the paper beneath. This procedure is repeated for each sheet in the edition, after which the stencil is discarded.
Editions, Signed and Numbered
The printing process is highly labor-intensive, encompassing the creation of designs, their transfer to the screen, color mixing, and the printing of the entire edition. Typically, a silkscreen printer allows for an additional 10% over the intended edition size to accommodate any prints that may be rejected due to printing errors. In my practice, larger prints can require 3 to 4 months for completion, while smaller prints may be finalized in as little as one month.
A silkscreen printer generally produces a limited edition of their designs. An edition of a fine art print consists of all images produced simultaneously. Editions of silkscreens can range from 1 to 500 prints. The size of the edition can be influenced by the printing process itself, as the stencils may degrade over time; however, it is typically the artist who determines the edition limit. Since the stencils are destroyed post-printing, each edition remains distinct.

Prints are signed and numbered in the lower margin of the print, resembling a fraction. The upper number denotes the specific impression within the series, while the lower number indicates the total edition size. A print labeled 2/25 signifies that it is the second print out of a total of twenty-five images. This numbering reflects the sequence in which the prints were signed, rather than the order in which the impressions were produced. Consequently, later impressions may sometimes exhibit superior quality compared to earlier pulls, indicating that lower numbers do not inherently signify better quality.
An original fine art print is a "multiple original" created through a manual process, with each impression made individually from a matrix—typically wood, copper, zinc, or in this case, amberlith film—that has been meticulously etched or carved by the artist. The tactile quality of the ink on paper and the specific printing technique employed are integral to the artwork itself, characteristics that cannot be replicated in reproductions.
In contrast, a reproduction is merely a copy of an existing artwork. It is typically produced through photo-mechanical processes, often involving scanning and mass printing. There is no direct involvement from the artist in the creation of reproductions. Essentially, reproductions are akin to posters, frequently referred to as iris or giclée prints, and they generally possess minimal or no monetary value. The inks used in these reproductions are prone to fading when exposed to sunlight, and the paper may not be 100% cotton or acid-free, leading to degradation and yellowing over time.
Despite advancements in printing technology and the use of high-quality printers for giclée or iris prints, the outcome remains inferior to that of fine art prints. Furthermore, reproductions can be produced in unlimited quantities, as the matrix does not degrade with use. To create an illusion of scarcity and enhance perceived value, publishers may artificially limit the edition size, which can lead to confusion regarding authenticity when the artist signs and numbers these prints.

How Does Screen Printing Work?
Screen printing can be executed manually or through automated machinery, but the fundamental process remains consistent. Variations may arise based on the type of ink employed, the desired visual effects, and the substrate being printed on. Below is a detailed, step-by-step outline of the screen printing process:
Step 1: Design Development
The initial phase of screen printing involves conceptualizing and creating the design. Once the design has been finalized, it is printed onto a transparent acetate film, which will serve as the template for producing the screen or stencil.
Step 2: Screen Selection and Preparation
- With the design ready, the next step is to choose the appropriate screen and determine the mesh count. The mesh count refers to the number of threads per square inch in the screen fabric. The optimal mesh count depends on the intricacy of the design being printed:
- A higher mesh count is ideal for capturing fine details while maintaining a consistent ink application.
- Conversely, screens with a lower mesh count allow for greater ink flow due to their larger openings.
Once the appropriate mesh screen is selected, it is coated with a light-sensitive emulsion layer, which will facilitate the creation of the stencil.
Step 3: Emulsion Exposure
The transparent acetate film is meticulously positioned on the emulsion-coated mesh screen beneath a bright light source. This exposure process causes the emulsion to harden and develop. It is essential to note that when working with designs that incorporate multiple colors, separate screens must be prepared for each color to ensure accurate layering.
Step 4: Stencil Development
The screen is exposed for a predetermined duration, allowing the light to harden the areas of the emulsion that are not covered by the acetate film. Any unhardened emulsion is subsequently rinsed away, resulting in a clear stencil on the screen. After drying, any necessary touch-ups are performed by the printer to ensure the stencil closely resembles the original design. The stencil is now fully prepared for printing.
Step 5: Print Setup
The substrate to be printed is laid flat on the printing board, with the screen positioned on top in the desired alignment, ready for the printing process.
Step 6: Design Application
In this critical step, the design is brought to life. The screen is lowered onto the printing board, and the selected color of ink is applied to the top of the screen. A squeegee is then utilized to evenly distribute the ink across the length of the screen. The ink is forced through the open areas of the stencil, effectively transferring the design onto the substrate below.
Step 7: Curing and Finishing
Once all items have been printed, the stencil has fulfilled its purpose. A specialized washing solution is employed to remove the emulsion, allowing the mesh to be reused for the creation of new stencils. Finally, the printed products undergo heat curing by passing through a dryer, which ensures a smooth finish and enhances the durability of the design, preventing any fading over time.
For more details, please contact at +86 15097355251
Happy Holidays from the Team at Enyang
What is rotary printing?
Related Article


