
How to Use a Screen Printing Machine

How to Use a Screen Printing Machine?
Screen printing is one of the most reliable and versatile printing methods used across textiles, signs, packaging, industrial labels, promotional products, electronics, and many custom manufacturing applications. Whether you are printing T-shirts, flat panels, plastic sheets, metal parts, glass, paper, or cylindrical substrates, the quality of the final print depends not only on the screen, ink, and substrate, but also on how well the screen printing machine is set up and operated.
Many printing problems—such as uneven ink deposit, blurry edges, poor registration, smearing, mesh marks, or inconsistent color coverage—are not caused by the ink alone. They often come from incorrect machine adjustment, improper squeegee pressure, poor off-contact distance, flood bar misalignment, or failure to understand how the squeegee should move during the print stroke.
This guide explains how to use a screen printing machine from a practical and professional point of view. It covers the full printing process, including machine preparation, screen installation, squeegee and flood bar adjustment, off-contact setup, ink flooding, print stroke control, and troubleshooting. For businesses using manual, semi-automatic, or automatic screen printing equipment, these steps can help improve consistency, reduce waste, and achieve more stable production quality.

Understand the Basic Screen Printing Process
Before operating a screen printing machine, it is important to understand what happens during one complete print cycle. Screen printing uses a mesh screen with a stencil image. Ink is placed on top of the screen, and a squeegee pushes the ink through the open areas of the mesh onto the substrate below.
A typical screen printing cycle includes four key steps:
• The substrate is placed on the printing table, platen, vacuum bed, or fixture.
• The flood bar spreads ink across the screen surface and fills the stencil openings.
• The squeegee moves across the screen, applying pressure to transfer ink through the mesh.
• The screen lifts away from the substrate, allowing the printed image to release cleanly.
The purpose of the machine is to control these steps with accuracy and repeatability. A good operator does not simply “press start.” A professional operator understands how each adjustment affects ink transfer, image definition, pressure balance, and production stability.
Prepare the Machine Before Printing
Before starting production, check that the machine is clean, stable, and suitable for the job. Inspect the table or platen surface and remove dust, dried ink, tape residue, loose fibers, or any object that may affect flatness. For vacuum tables, confirm that the vacuum holes are not blocked and that the substrate can sit firmly during printing.
Next, check the screen frame. The frame should be clean, dry, flat, and properly tensioned. If the screen mesh is loose or uneven, even a perfectly adjusted machine cannot produce a sharp print. The stencil should be fully cured, free from pinholes, and correctly positioned for the artwork.
Also prepare the correct squeegee, flood bar, and ink. The squeegee width should be slightly wider than the printed image, but not excessively wide. A very wide squeegee may require more pressure and can create uneven force at both ends. For wider squeegees, a dual-head squeegee system is often more stable because it allows better pressure control on both sides.
Install and Align the Screen Frame
Place the screen frame into the screen holders or clamping system. Make sure it is seated securely and evenly. The screen should be parallel to the printing table from left to right and front to back. Poor screen alignment can cause uneven off-contact, inconsistent pressure, and poor image registration.
For flatbed screen printing, the bottom of the screen should not simply lie on the substrate during setup. A controlled gap, known as off-contact or snap-off distance, is required. This allows the screen to separate cleanly from the printed surface immediately after the squeegee passes.
When using a screen frame smaller than the vacuum table or printing bed, make sure the frame holder does not interfere with close contact between the screen and the substrate. Special clamping methods, custom screen frames, or support attachments may be needed for smaller screens or unusual substrates.
Set the Off-Contact Distance
Off-contact is the gap between the bottom of the screen mesh and the top surface of the substrate. This distance is one of the most important settings in screen printing. If the off-contact is too low, the screen may drag across the substrate, causing smearing or ink build-up. If it is too high, the squeegee may need excessive pressure to bring the mesh into contact, which can distort the image or damage the stencil.
For most flat substrates, off-contact should be adjusted according to the substrate thickness, screen tension, ink viscosity, print size, and image detail. A higher-tension screen usually requires less off-contact, while a loose screen may require more distance but will be less precise.
On many screen printing machines, the off-contact can be adjusted by raising or lowering the carriage or screen frame assembly. After adjustment, lock the levers or handles securely. The screen should remain level with the table. Slight tilting may be used for special applications, but excessive tilting can create mechanical stress and registration problems.
A proper off-contact setting allows the screen to touch the substrate only at the squeegee contact line during the print stroke, then quickly release after the squeegee passes.
Install the Squeegee Correctly
The squeegee is the main tool that transfers ink through the screen. It must be installed firmly, straight, and at the correct angle. Most standard screen printing machines use a squeegee holder angle of approximately 15 degrees from vertical. This angle is suitable for many flat substrate applications because it provides a balanced combination of ink transfer, edge definition, and pressure control.
The squeegee blade should be clean, sharp, and free from nicks or rounded edges. A damaged squeegee can create streaks, uneven ink coverage, or poor print detail. The squeegee rubber should also match the printing job. Softer blades deposit more ink and are useful for heavier coverage, while harder blades provide sharper definition and thinner ink deposit.
When installing the squeegee, make sure the quick-release pin or locking mechanism is not under excessive force. The squeegee should be secure, but it should not be jammed against the release pin. If the tilt screws press too tightly against the squeegee holder, the quick-release pin may become difficult to remove, and the squeegee may lose its natural floating movement.
Adjust the Squeegee Down Limit
The squeegee down limit controls how far the squeegee travels downward toward the screen and substrate. It acts as a mechanical stop. This setting directly affects how the squeegee contacts the screen during the print stroke.
For most flat substrates, the squeegee down limit should allow the adjustment knob to reach its bottom position during printing. This means the stop makes contact at the intended limit, while the flexibility of the squeegee rubber compensates for minor variations in substrate thickness or flatness.
This is important because the squeegee should not rely only on excessive air pressure or cylinder force to press against the screen. The mechanical stop helps establish a consistent travel distance, while the rubber blade provides controlled flexibility.
For irregular substrates, such as slightly concave or convex surfaces, the setup may be different. If the machine includes an adjustable squeegee pressure gauge and regulator, the down limit can be adjusted so the squeegee cylinder has enough freedom to follow the shape of the substrate. In this case, the squeegee holder can rise and fall during the print stroke instead of forcing the rubber blade to bend excessively.
This method helps maintain a more consistent squeegee angle. If the squeegee is forced to deflect too much, the angle of attack changes, pressure increases unevenly, and print quality may be reduced.
Adjust the Squeegee Up Stop Limit
The squeegee up stop limit controls how far the squeegee rises when it retracts after the print stroke. As a general rule, the squeegee should lift approximately 1/8 inch, or about 3 mm, above the screen when retracted. This small clearance helps prevent unnecessary contact with the screen while keeping the print head movement efficient.
The up stop limit also helps prevent unwanted rotation of the squeegee assembly during operation. A stable squeegee position is important for repeatable print quality, especially during longer production runs.
In some situations, the up stop can also be adjusted to change the squeegee skew angle. A slight skew, sometimes called a snowplow angle, may help move ink in a controlled direction or improve print definition when needed. However, in standard screen making, many printers prefer to angle the mesh on the frame rather than rely heavily on squeegee skew during printing.
The goal is not to overcomplicate the adjustment. For most production jobs, keep the squeegee stable, level, and slightly lifted during retraction.
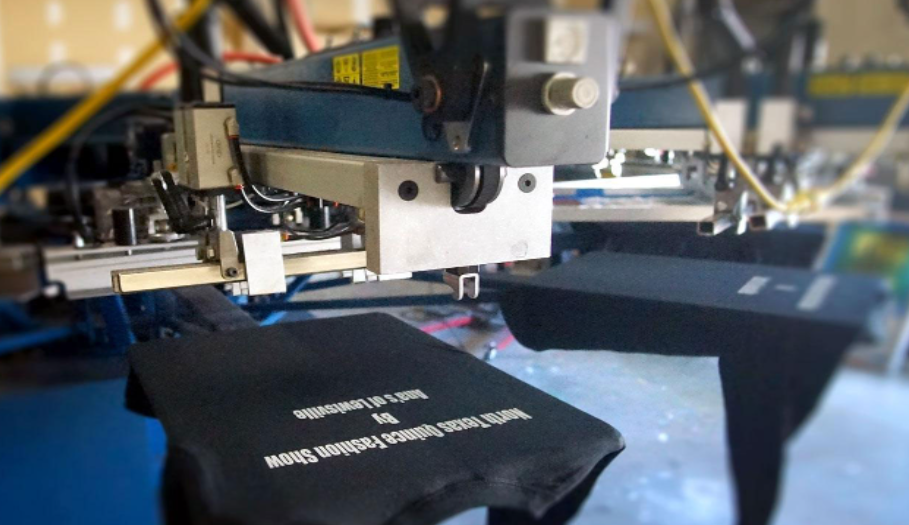
Set Squeegee Pressure Properly
Squeegee pressure is one of the most misunderstood settings on a screen printing machine. More pressure does not always produce a better print. In fact, excessive pressure is one of the most common causes of poor print quality.
Too much pressure can force the mesh too hard against the substrate, distort the stencil, widen fine lines, push excess ink through the screen, and reduce image sharpness. It can also increase squeegee wear, damage the screen, and cause inconsistent ink deposit.
Many machines include a pressure regulator and gauge for adjusting the force applied by the squeegee cylinder. A normal setting may be around 30 psi on some machines, but the best pressure depends on the ink, mesh count, substrate, squeegee hardness, and image detail.
It is important to understand the difference between squeegee pressure and squeegee travel distance. The pressure regulator controls force, while the down limit controls how far the cylinder can travel. A good setup considers both. The squeegee should use the minimum pressure required to produce a clean, complete print.
A professional approach is to start with lower pressure and increase gradually only if the ink does not transfer properly. If a clean print requires very high pressure, check the screen tension, off-contact, ink viscosity, stencil quality, and squeegee blade condition before assuming pressure is the only issue.
Install and Adjust the Flood Bar
The flood bar spreads ink across the screen before the print stroke. Its job is to fill the stencil openings with ink, not to print the image. The flood bar should be parallel to the screen and positioned close to the mesh without touching it.
When installing or changing flood bar sizes, loosen the flood bar mount screws and position the flood bar carefully. The flood bar edge should be even across the width of the screen. A simple setup method is to place a thin piece of cardboard or plastic between the flood bar edge and the screen mesh while tightening the screws by hand. This helps create a consistent gap.
After tightening, view the flood bar from behind the print head. A thin, even line of light between the flood bar and the screen indicates that the flood bar is parallel. If one side is closer than the other, gently adjust the flood bar until the spacing is even.
The flood bar down limit should be set so that the flood bar comes close to the screen but never presses into it. If the flood bar touches the mesh, it can damage the screen or cause unwanted ink movement. On powered machines, incorrect flood bar adjustment may even risk tearing the screen during machine cycling.
Add Ink and Perform the Flood Stroke
Once the screen, squeegee, and flood bar are set, add ink to the screen. Place the ink in front of the squeegee or in the proper flood area depending on the machine design. Do not overload the screen with too much ink. Excess ink can make control difficult, especially on detailed artwork.
During the flood stroke, the flood bar moves ink across the screen and fills the open stencil areas. The flood stroke should be smooth and even. The flood bar should carry enough ink to keep the image area wet, but it should not scrape aggressively against the screen.
For manual and semi-automatic printing, maintaining a consistent flood stroke is essential. If the stencil dries out or the ink is not distributed evenly, the next print may show weak coverage, missing details, or inconsistent density.
For long production runs, monitor the ink throughout the process. Ink viscosity can change over time due to evaporation, temperature, or contamination. Stir ink when necessary and keep the screen clean.
Make the Print Stroke
The print stroke is where ink is pushed through the mesh and transferred onto the substrate. During this stroke, the squeegee should contact the screen with controlled pressure, move smoothly across the image area, and maintain a consistent angle.
The squeegee should not bounce, chatter, drag unevenly, or press excessively into the mesh. A smooth print stroke usually indicates that the machine settings are balanced. If the squeegee is deflecting heavily, the pressure may be too high, the off-contact may be excessive, or the down limit may be incorrectly set.
For flat substrates, the squeegee rubber can compensate for small variations in surface height. For irregular surfaces, a pressure-controlled setup allows the squeegee holder to rise and fall more naturally. This helps avoid forcing the squeegee to bend too much and preserves a consistent printing angle.
After the print stroke, the screen should separate cleanly from the substrate. The printed image should have sharp edges, even ink coverage, and accurate placement.
Check the First Printed Sample
Never begin mass production without checking the first printed sample. Inspect the print under good lighting and look for:
• Sharpness of image edges
• Even ink coverage
• Correct registration
• Proper color density
• No smearing or ghosting
• No pinholes or missing details
• No excessive ink build-up
• No substrate movement during printing
If the print is too light, do not immediately increase pressure. First check whether the screen is properly flooded, whether the ink is too thick, whether the mesh count is suitable, and whether the stencil is open. If the print is too heavy or blurry, reduce pressure, check off-contact, inspect the squeegee edge, and confirm that the substrate is held firmly.
A professional printing workflow always includes testing, measuring, adjusting, and documenting settings before full production.
Maintain Consistency During Production
Once the sample is approved, begin production using the same speed, pressure, flood stroke, and substrate placement method. Consistency is the key advantage of a properly adjusted screen printing machine.
During production, operators should regularly check the print quality. Ink may build up on the bottom of the screen, especially when printing fine details or using high-viscosity ink. If this happens, stop and clean the screen carefully before continuing.
Also monitor the squeegee blade. A worn or swollen blade can change ink deposit and reduce print sharpness. For longer runs, it may be necessary to rotate or replace the squeegee.
For vacuum tables, check that each substrate is held firmly. For textile platens, confirm that garments are loaded straight and flat. For rigid materials, use guides, stops, or fixtures to keep placement consistent.
Common Screen Printing Machine Settings
| Machine Setting | Purpose | Professional Recommendation |
|---|---|---|
| Off-contact distance | Controls screen snap-off and image release | Set according to substrate thickness, screen tension, and ink type |
| Squeegee down limit | Controls downward travel of the squeegee | Allow controlled contact without excessive blade deflection |
| Squeegee up stop | Limits upward movement after print stroke | About 1/8 inch or 3 mm above the screen is often suitable |
| Squeegee pressure | Controls force applied during printing | Use the minimum pressure required for a clean print |
| Flood bar down limit | Controls flood bar distance from screen | Keep close to the screen but never touching |
| Squeegee angle | Controls ink transfer and print definition | Around 15 degrees from vertical is common for flat substrates |
| Flood stroke | Fills stencil openings before printing | Keep smooth, even, and consistent |
Troubleshooting Common Printing Problems
If the print looks blurry, the most likely causes are too much squeegee pressure, too much off-contact, loose screen tension, excessive ink deposit, or a damaged squeegee edge. Reduce pressure first, then check screen tension and squeegee condition.
If the print is too light, the screen may not be flooded properly, the ink may be too thick, the squeegee pressure may be too low, or the stencil may be partially blocked. Clean the stencil and confirm that the flood stroke is filling the image area.
If ink is building up on one side of the screen, check whether the flood bar and squeegee are parallel. In some cases, a slight squeegee skew adjustment may help, but the root cause should still be investigated.
If the screen tears or shows wear near the flood bar area, the flood bar may be touching the mesh or set too low. Adjust the flood bar down limit immediately and inspect the screen before continuing.
If registration changes during production, check substrate positioning, screen clamps, frame movement, vacuum strength, and print head stability.
Safety and Maintenance Tips
A screen printing machine should always be operated with attention to safety. Keep hands away from moving parts during automatic cycles. Make adjustments only when the machine is stopped or in a safe setup mode. Do not remove the squeegee or flood bar while the screen is positioned in a way that creates pressure or mechanical interference.
Clean the squeegee, flood bar, screen, and table after printing. Dried ink on machine components can affect future setup accuracy. Lubricate moving parts according to the manufacturer’s instructions and regularly inspect air lines, regulators, cylinders, clamps, and locking levers.
Good maintenance improves print quality, reduces downtime, and extends the life of the machine.
Professional Workflow for Using a Screen Printing Machine
A reliable production workflow may look like this:
- Clean and inspect the printing table or platen.
- Install and align the screen frame.
- Set the correct off-contact distance.
- Install the squeegee and flood bar.
- Adjust the squeegee down limit and up stop.
- Set the squeegee pressure to a low starting point.
- Adjust the flood bar so it is parallel and close to the screen.
- Add ink and perform a test flood stroke.
- Print a sample and inspect the result.
- Fine-tune pressure, speed, angle, or off-contact if needed.
- Begin production after sample approval.
- Monitor print quality throughout the run.
- Clean the machine and record useful settings after production.
This workflow helps operators move from guesswork to controlled production.
FAQ: How to Use a Screen Printing Machine
What is the most important setting on a screen printing machine?
There is no single setting that works alone. Off-contact, squeegee pressure, squeegee angle, screen tension, and flood bar position all work together. However, excessive squeegee pressure is one of the most common causes of poor print quality, so it should always be controlled carefully.
How much squeegee pressure should I use?
Use the minimum pressure needed to achieve a clean and complete print. Too much pressure can distort the stencil, reduce image sharpness, and force too much ink onto the substrate.
Should the flood bar touch the screen?
No. The flood bar should come close to the screen but should not touch or press into the mesh. Its purpose is to spread ink and fill the stencil, not to print.
Why is off-contact important?
Off-contact allows the screen to separate cleanly from the substrate after the squeegee passes. Without proper off-contact, the print may smear, stick, or lose edge definition.
What squeegee angle is best for screen printing?
A common standard angle is approximately 15 degrees from vertical for many flat substrate applications. The best angle may vary depending on ink type, substrate, image detail, and machine design.
Why does my screen print look blurry?
Blurry prints may be caused by too much pressure, poor off-contact, low screen tension, excessive ink deposit, worn squeegee rubber, or substrate movement.
Can one screen printing machine print different materials?
Yes. Screen printing machines can be used for textiles, plastics, paper, glass, metal, wood, and many other materials. However, each material may require different ink, screen mesh, off-contact, pressure, curing method, and fixture setup.
Conclusion
Learning how to use a screen printing machine professionally is not only about knowing which button to press. It requires understanding the relationship between the screen, squeegee, flood bar, ink, substrate, and machine adjustments. Every setting has a purpose.
The squeegee down limit controls travel. The squeegee pressure controls force. The up stop controls retraction height. The flood bar prepares the stencil for printing. The off-contact distance controls how the screen releases from the substrate. When these elements are adjusted correctly, the machine can produce clean, sharp, and repeatable prints.
For businesses that rely on screen printing for production, proper machine setup helps reduce waste, improve efficiency, and maintain consistent quality across every order. Whether you are printing flat panels, garments, labels, packaging, or industrial components, a well-adjusted screen printing machine is the foundation of professional results.
How to Make Reusable Silk Screens for Printing on Fabric
What Is Digital Fabric Printing?
Related Article


